How to Set Up a WordPress Security Plugin (Step-by-Step Guide)
Most WordPress security tutorials show installation. This one shows configuration — the part that actually protects your business website
Installing the plugin is five minutes. Configuring it correctly is what actually protects your business — and most guides skip that part entirely.
By Sheikh Hassaan — Web developer for service businesses
Quick Answer
To set up a WordPress security plugin correctly: install Wordfence or Solid Security, run the setup wizard, move the firewall to Extended Protection mode, limit login attempts to 3 failures, enable two-factor authentication on the admin account, schedule weekly malware scans, and tune email alerts. Installation takes 5 minutes. Proper configuration takes 30. Unfortunately, most people only do the first part.
Why Most WordPress Security Setups Fail
There are over 60,000 WordPress plugin tutorials on YouTube. The vast majority show the same thing: open the dashboard, search for the plugin, click install, click activate. Done.
The problem is that installing a security plugin without configuring it is roughly equivalent to buying a lock and leaving it in the box next to the door. The protection exists in theory. In practice, your site is still open.
For a service business, the consequences of a compromised site aren't abstract:
- Visitors arrive at a page that redirects to a gambling site or pharmacy spam
- Google removes your site from search results under a malware warning
- Your hosting provider suspends the account pending investigation
- Client inquiries that came through your contact form stop arriving
- You spend days — and sometimes hundreds of dollars — on cleanup instead of client work
None of this requires a sophisticated attacker. Automated bots scan millions of WordPress sites constantly, testing for weak login credentials, known plugin vulnerabilities, and open attack surfaces. A correctly configured security plugin closes those doors. A default-settings install leaves most of them open.
This guide covers the configuration steps that actually matter — not just the install.
Which Plugin Should You Use?
The right plugin depends on your hosting environment. Using the wrong one creates performance issues and false coverage.
If You Are on Managed Hosting
Managed WordPress hosts like WP Engine, Kinsta, and SiteGround Business include server-level firewalls, DDoS protection, and malware scanning on their end. Installing a full security suite like Wordfence on top of this creates conflicts and server load without adding meaningful protection.
For managed hosting, use Solid Security (formerly iThemes Security) — free tier. It provides login hardening, 2FA, file change detection, and brute force protection without running a competing firewall. Lighter, cleaner, and appropriate for the environment.
If You Are on Shared or Budget Hosting
Wordfence is the right choice for shared hosting. It provides a complete protection stack — firewall, malware scanner, login protection, and real-time monitoring. On shared hosting where the server has no built-in security layer, you need all of it.
The steps below cover Wordfence in full, with a separate section for Solid Security on managed hosting.
Most business owners I work with prefer having this fully configured from day one — so they can focus on running their business instead of learning plugin settings.
Step-by-Step Setup: Wordfence (Most Common Setup)
Website Protection
Step 1 — Install and Activate
What to do: Go to your WordPress dashboard, navigate to Plugins > Add New, search for Wordfence Security, install, and activate. The plugin will prompt you to enter an email address for alerts — use a real inbox you check regularly.
Why it matters: The alert email is where Wordfence sends every warning about blocked attacks, failed logins, and detected malware. If this goes to an inbox you ignore, the monitoring system is effectively disabled.
Pro Insight:
Use a dedicated email for site alerts if you manage multiple sites. A separate address means security notifications don't get buried in client emails — and you'll actually read them.
Step 2 — Run the Setup Wizard
What to do: After activation, Wordfence will prompt you to run a setup wizard. Follow it. It configures basic options and puts the firewall into Learning Mode — a one-week period where it observes your normal traffic before enforcing rules.
Why it matters: Learning Mode exists to prevent the firewall from blocking legitimate traffic — like your own admin access or specific integrations you use. Skipping the wizard and going straight to enforcement can lock you out of your own site or block tools you rely on.
Pro Insight:
Note the date you install. After 7 days, go back into Wordfence > Firewall and manually switch from Learning Mode to Enabled. Most people forget this step entirely and run on Learning Mode for months — meaning the firewall is observing but not protecting.
Step 3 — Move the Firewall to Extended Protection
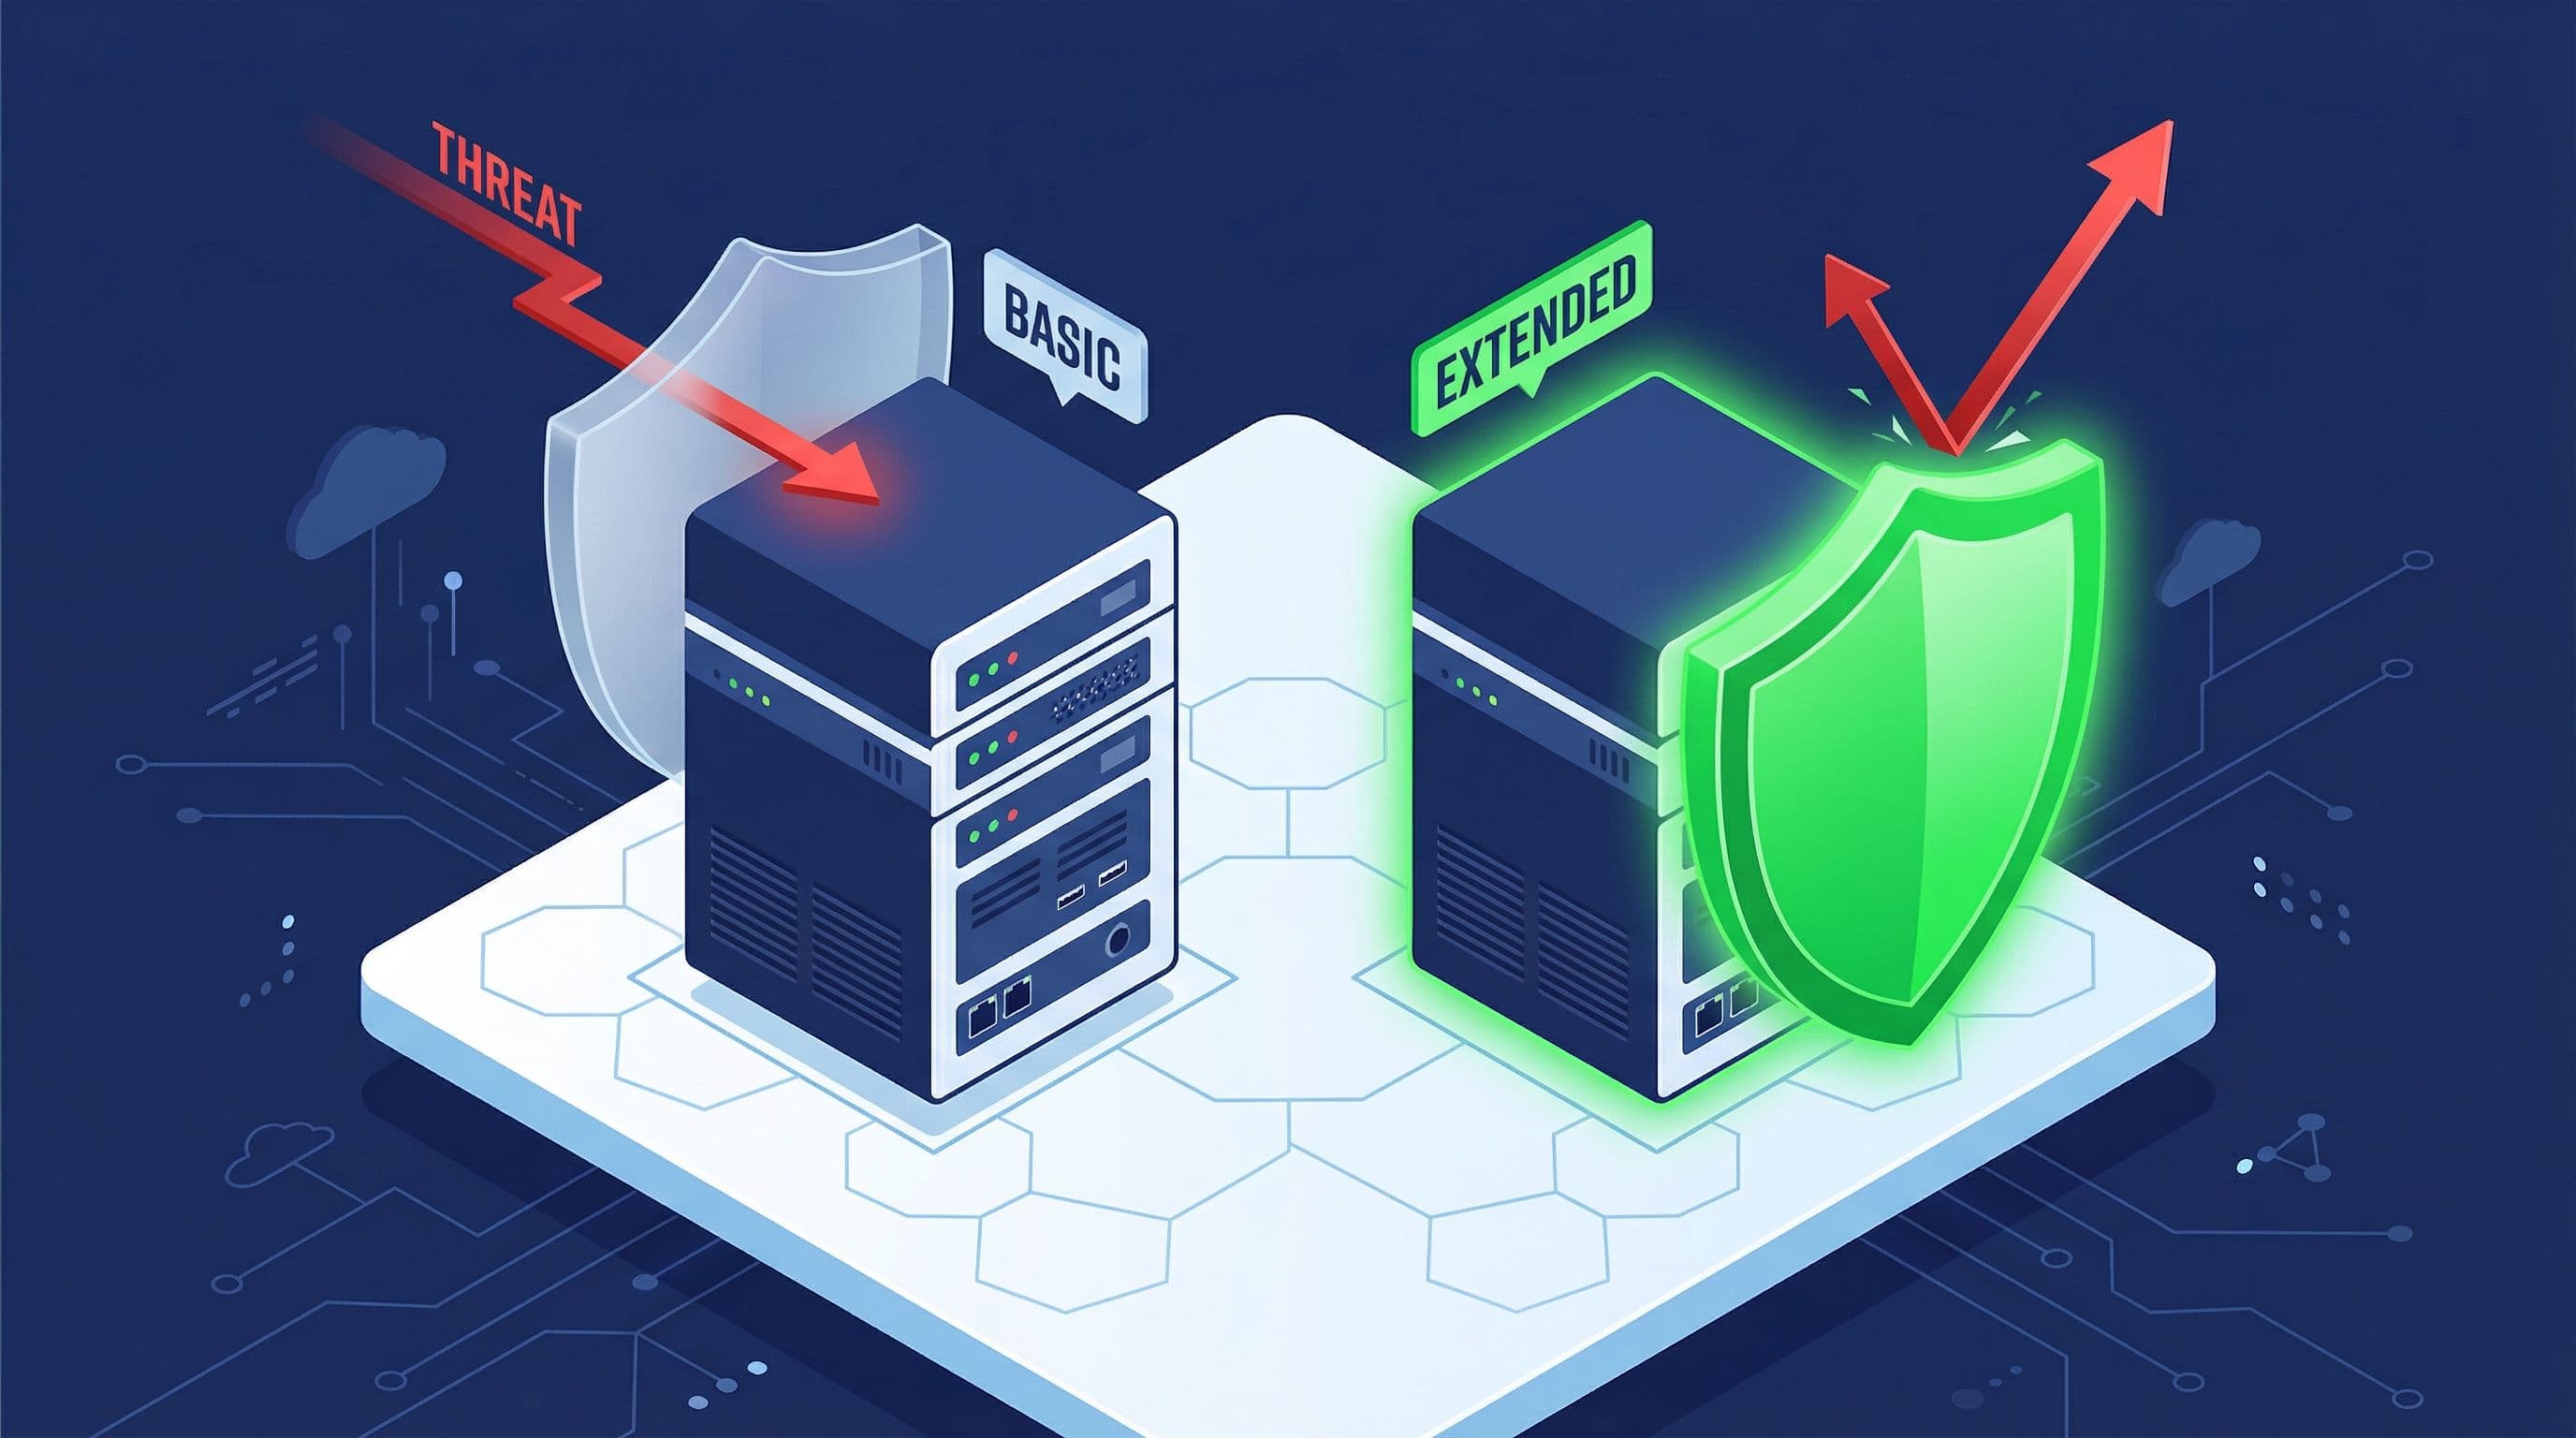
Firewall Protection
What to do: Go to Wordfence > Firewall. At the top, you'll see the firewall is set to Basic WordPress Protection. Click Optimize the Wordfence Firewall. Wordfence will show instructions for updating your wp-config.php file — follow them exactly or use the automatic option if offered.
Why it matters: Basic Protection means the firewall activates after WordPress loads. Extended Protection means it activates before WordPress loads — catching attacks before they reach your site at all. This is the single most impactful configuration change in the entire plugin, and it requires one extra step that most people skip.
Pro Insight:
If the automatic method fails (it sometimes does on specific hosts), the manual method involves adding two lines to wp-config.php. It sounds technical but Wordfence gives you the exact code to copy-paste. This step is worth doing even if it takes an extra 10 minutes.
Step 4 — Configure Login Security
What to do: Go to Wordfence > All Options > Brute Force Protection. Set the following:
- Lock out after 3 failed login attempts
- Lock out after 2 forgot password attempts
- Count failures over a 4-hour period
- Lockout duration: 4 hours minimum
- Enable the option to immediately lock out invalid usernames
Why it matters: Brute force attacks cycle through thousands of username/password combinations automatically. Without limits, a bot can make thousands of attempts per hour against your login page. These settings stop that within the first three tries.
Pro Insight:
Enable the option to lock out immediately if someone tries to log in as 'admin'. It's the most commonly targeted username in WordPress. If that username doesn't exist on your site, any attempt to use it is an attack — lock it out instantly.
Step 5 — Enable Two-Factor Authentication
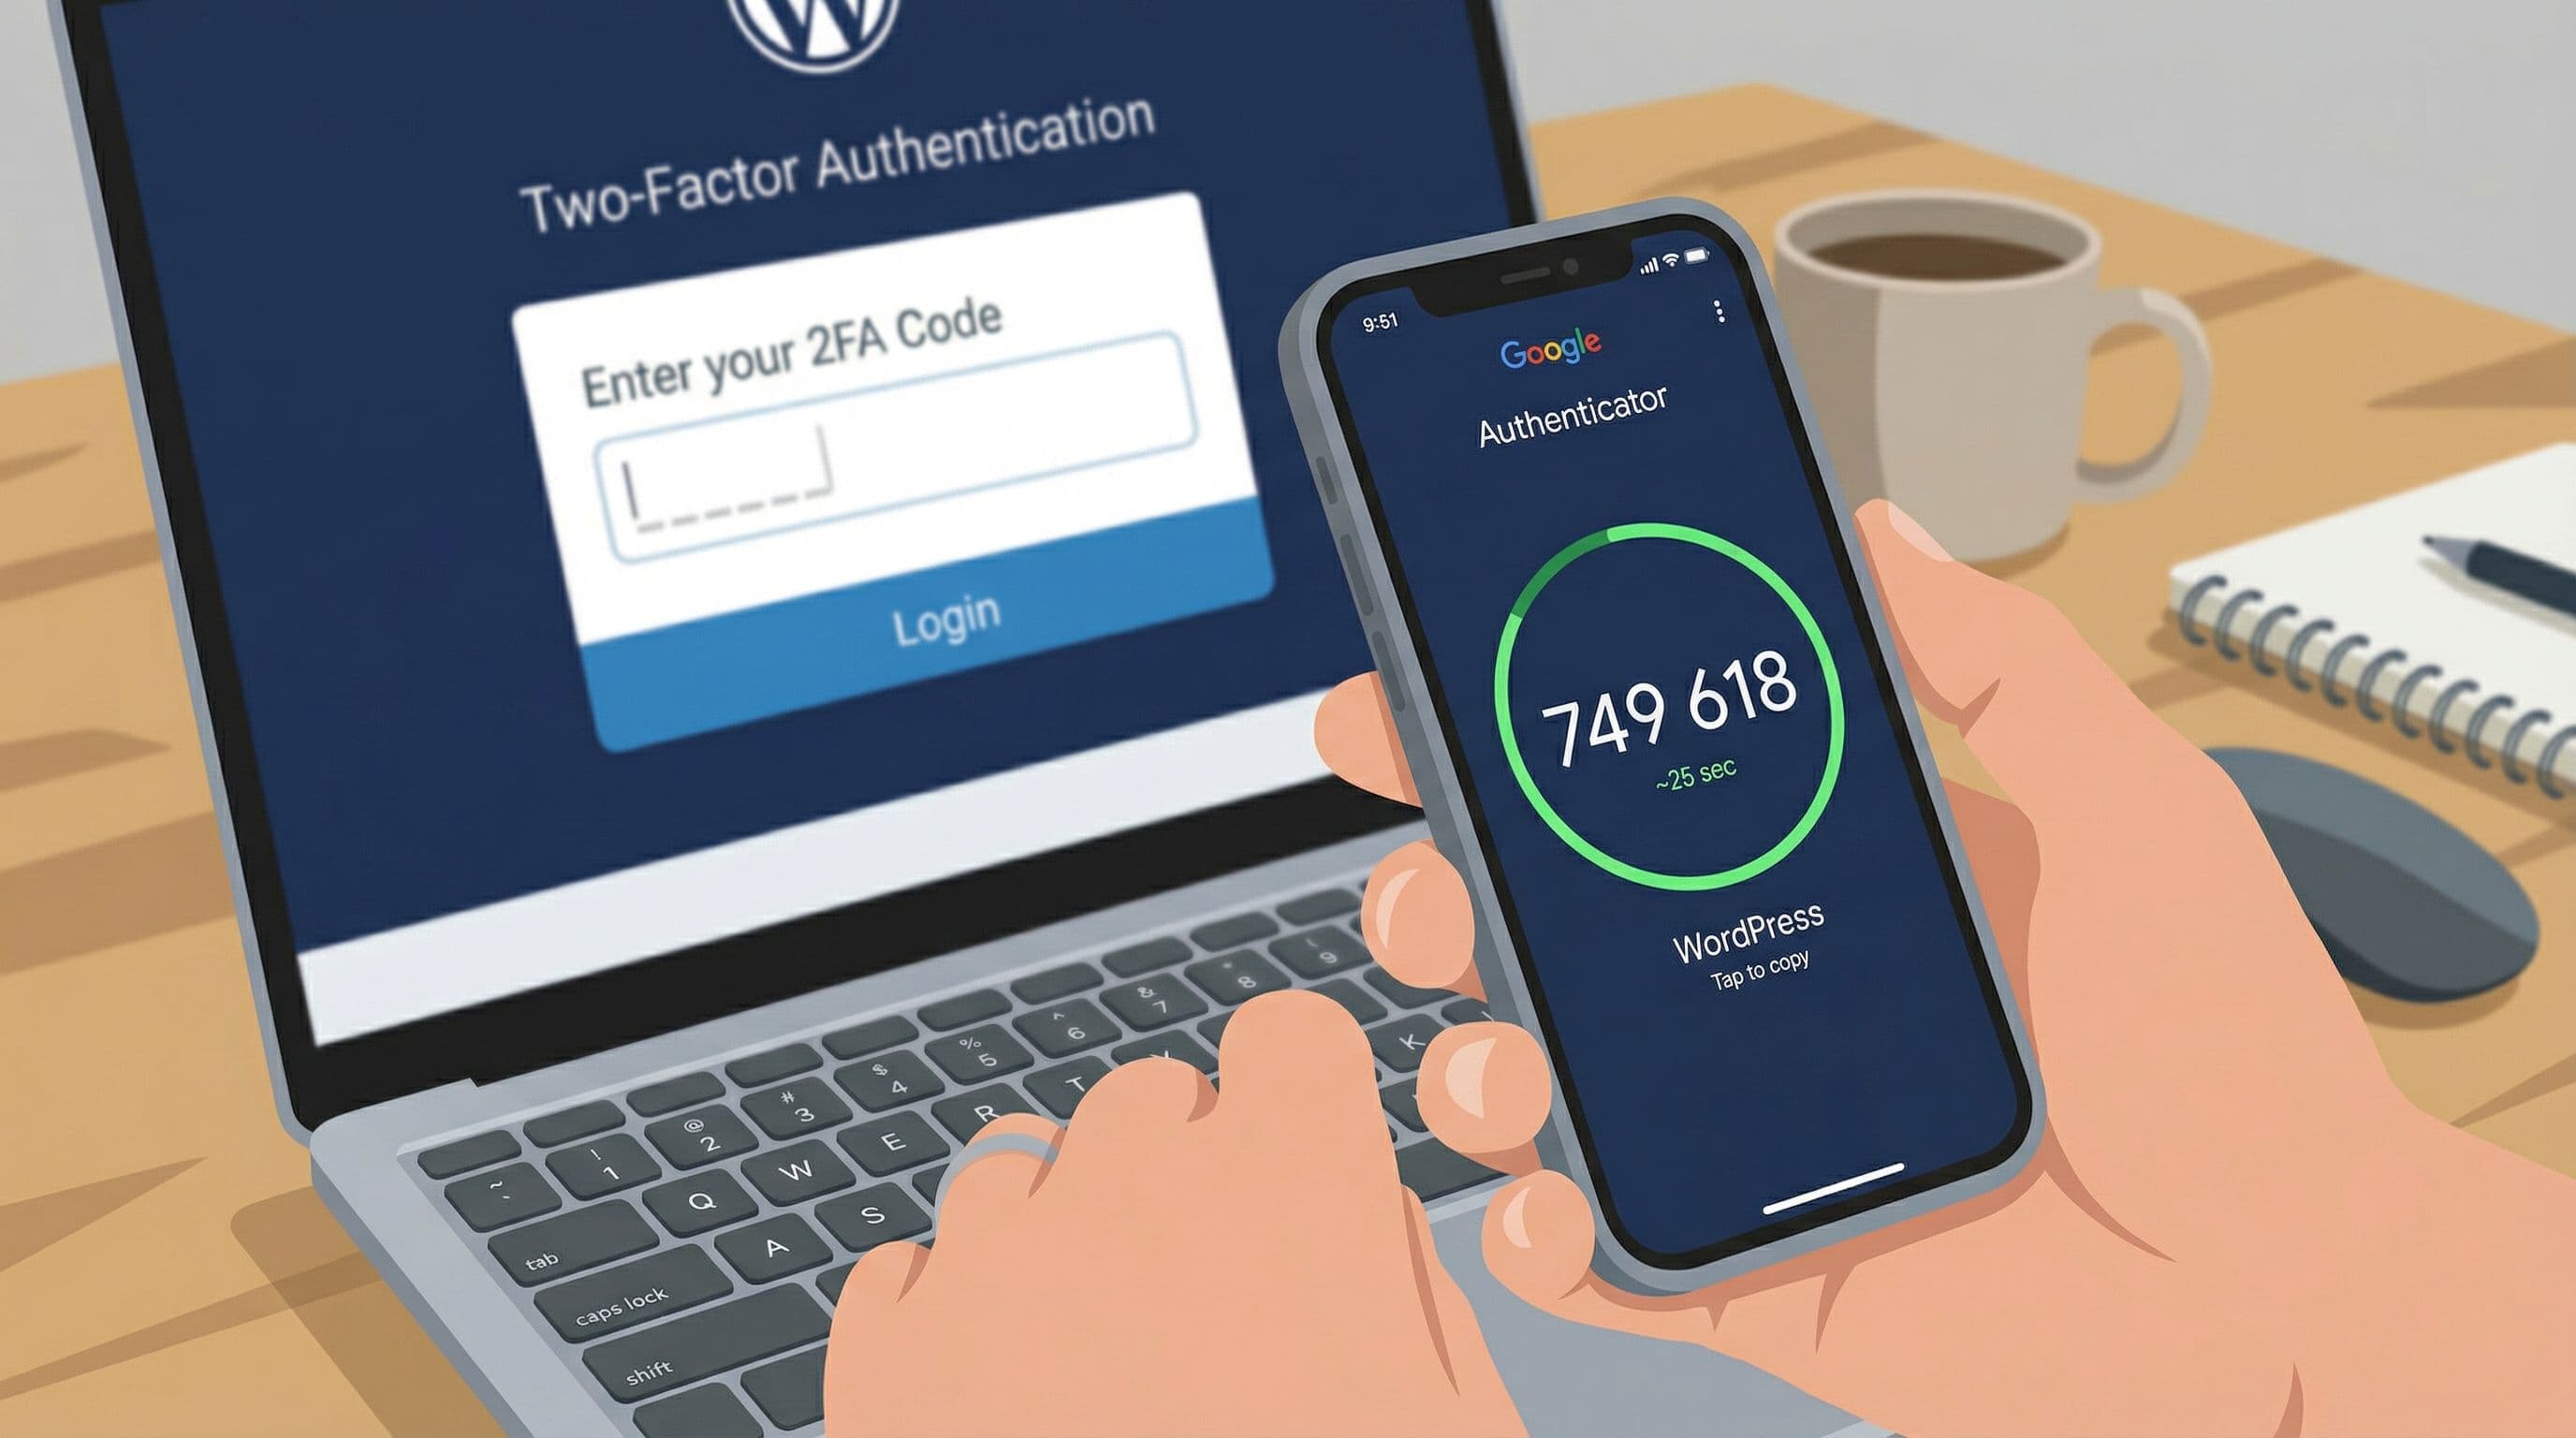
2-Factor Authentication
What to do: Go to Wordfence > Login Security. Enable two-factor authentication for Administrator-level accounts. You'll scan a QR code with an authenticator app — Google Authenticator or Authy both work. Save your recovery codes somewhere secure.
Why it matters: 2FA means even if someone obtains your password through a data breach or phishing attempt, they still cannot log in without physical access to your phone. It eliminates credential stuffing as an attack vector entirely. This single step stops the majority of WordPress account takeovers.
Pro Insight:
Store recovery codes in a password manager, not in your email. If someone has accessed your email, they've already compromised your first line of defense. Recovery codes in a separate secure location maintain a genuine backup.
Step 6 — Schedule Your Malware Scans
What to do: Go to Wordfence > Scan > Manage Scan. In the free version, scans are not scheduled automatically. Set a reminder to run a manual scan weekly, or use a cron job if you're comfortable with that. In the scan settings, enable all scan types — not just the quick scan.
Why it matters: The scanner checks your WordPress files against known clean versions, identifies modified core files, and flags malware signatures. If your site gets compromised, the scan is what surfaces it. Running it once at setup and never again is almost as bad as not running it at all.
Pro Insight:
Run your first scan immediately after setup — before assuming the site is clean. Inherited sites (ones you've taken over or had built by someone else) frequently have residual issues that aren't visible in the front end but show up in a scan.
Step 7 — Tune Your Email Alerts
What to do: Go to Wordfence > All Options > Email Alert Preferences. Disable notifications for every low-priority event. Keep alerts on for: new admin user created, lost password used, successful login by admin, scan results, and critical security issues.
Why it matters: Default Wordfence alert settings generate a high volume of low-priority emails. Most people start ignoring them within a week. An ignored alert inbox provides the same protection as no alerts at all. Tune it to notify you only when something genuinely requires your attention.
Pro Insight:
Set a minimum severity level for alerts. For a low-traffic service business site, 'High' severity only is a reasonable threshold. You'll receive meaningful alerts without inbox noise that trains you to dismiss everything.
Step 8 — Disable XML-RPC
What to do: Go to Wordfence > All Options > Firewall Options. Enable the option to block all XML-RPC requests. If you use the WordPress mobile app or Jetpack, leave this enabled — otherwise disable it.
Why it matters: XML-RPC is a remote access protocol built into WordPress that allows external applications to communicate with your site. Most business websites don't use it, but attackers exploit it regularly for brute force attacks that bypass standard login protections. If you don't need it, block it.
Step-by-Step Setup: Solid Security (For Managed Hosting)
If you're on managed WordPress hosting, use Solid Security instead of Wordfence. The setup is simpler:
- Install and activate Solid Security from the plugin directory
- Run the Security Check Pro scan from the dashboard — it identifies your site's current vulnerabilities and recommends fixes
- Enable Brute Force Protection under Security > Settings
- Enable Two-Factor Authentication under Security > Two-Factor
- Change the WordPress login URL under Advanced > Hide Backend — this alone stops the majority of automated login attacks
- Enable File Change Detection to alert you if core WordPress files are modified
- Disable the WordPress REST API for unauthenticated users under Security > WordPress Tweaks, unless you have a specific reason to keep it open
Solid Security on managed hosting gives you hardening and monitoring without competing with your host's own firewall. Total configuration time: 20 minutes.
Common Mistakes That Undo Everything
Installing Two Security Plugins Simultaneously
Running Wordfence and Solid Security — or any two full security plugins — at the same time creates firewall conflicts, duplicate alerts, and performance drag. They compete at the server level. Pick one based on your hosting environment and configure it properly. Two poorly configured plugins provide less protection than one correctly set up.
Leaving the Admin Username as 'admin'
WordPress used to default to 'admin' as the administrator username. Many sites still run this way. It's the first username every brute force tool tries. Rename it. Go to Users > Add New, create a new user with Administrator role and a unique username, log in with the new account, then delete the old 'admin' account and reassign its content to the new user.
Skipping the Firewall Optimization Step
The switch from Basic to Extended Protection in Wordfence is the configuration step that makes the biggest practical difference, and it's the one most often skipped because it requires touching a file outside the standard dashboard. The extra step is worth it. An unoptimized Wordfence firewall is running at significantly reduced effectiveness.
Not Keeping WordPress, Themes, and Plugins Updated
A security plugin cannot protect you from a vulnerability in an outdated plugin you haven't updated. Over 60% of WordPress compromises come through outdated plugins and themes, not through login attacks. Security configuration and regular updates are two separate layers — both are required. Enable automatic updates for minor versions, and check for major updates weekly.
Using Weak Hosting and Expecting the Plugin to Compensate
Budget shared hosting with no server-level isolation, no firewall, and overcrowded servers creates vulnerabilities that no plugin can fully address. A compromised neighboring account on shared hosting can affect yours regardless of how well Wordfence is configured. If you're serious about your business website, the hosting layer matters as much as the plugin layer.
The Recommended Full Security Stack
Security for a service business website isn't one plugin — it's a set of layers that each handle a different type of risk.
Layer 1 — Hosting
Managed WordPress hosting with server-level WAF and daily backups included. WP Engine, Kinsta, or SiteGround Business. This is the foundation everything else builds on.
Layer 2 — Security Plugin
Wordfence Free (properly configured) on shared hosting. Solid Security Free on managed hosting. Configuration following the steps in this guide. Not default settings.
Layer 3 — Login Hardening
2FA on all admin accounts. Login attempt limits enabled. Admin username changed from the default. Login URL changed from /wp-admin. These four changes collectively eliminate the most common attack vectors against WordPress sites.
Layer 4 — Backups
UpdraftPlus free with daily backups stored to Google Drive or Dropbox. This is independent of the security plugin. Security prevents breaches — backups recover from them when prevention fails. Both layers are necessary.
Layer 5 — Uptime Monitoring
UptimeRobot free tier. Two-minute check intervals with SMS alerts. Catches site outages, hosting suspensions, and redirect attacks within minutes rather than hours. Takes five minutes to configure and runs silently.
This full stack costs nothing beyond your hosting subscription and takes under 90 minutes to implement end to end.
Don't Have Time to Deal With This?

If you followed this guide, you now understand why configuration matters more than installation. You also have a clear picture of how many separate steps, settings, and decisions are involved in doing this correctly.
The $449 WordPress Website Package is built for service business owners who want this handled properly from the start — without spending a weekend learning plugin settings or discovering six months later that the firewall was never actually turned on.
One fixed price. No ongoing retainer. No agency overhead.
Related Articles
- Best WordPress Security Plugin for Small Business Websites (2026 Guide)
- Is the Free Version of Wordfence Enough for Your Business Website? (Honest Answer)
Frequently Asked Questions
How long does it take to properly set up a WordPress security plugin?
Following this guide, expect 30 to 45 minutes for a complete Wordfence setup on a new site. The setup wizard and basic activation take 5 minutes. The configuration steps — Extended Protection firewall, login limits, 2FA, scan scheduling, alert tuning — take the remaining time. Rushing through it in 10 minutes means missing the steps that matter most.
Do I need to be technical to configure Wordfence?
The majority of the configuration happens inside the WordPress dashboard with toggle switches and dropdown menus. The one step that requires minor technical action is the Extended Protection firewall optimization, which involves copy-pasting a code snippet that Wordfence generates for you. If you can follow written instructions carefully, you can complete the full setup without technical experience.
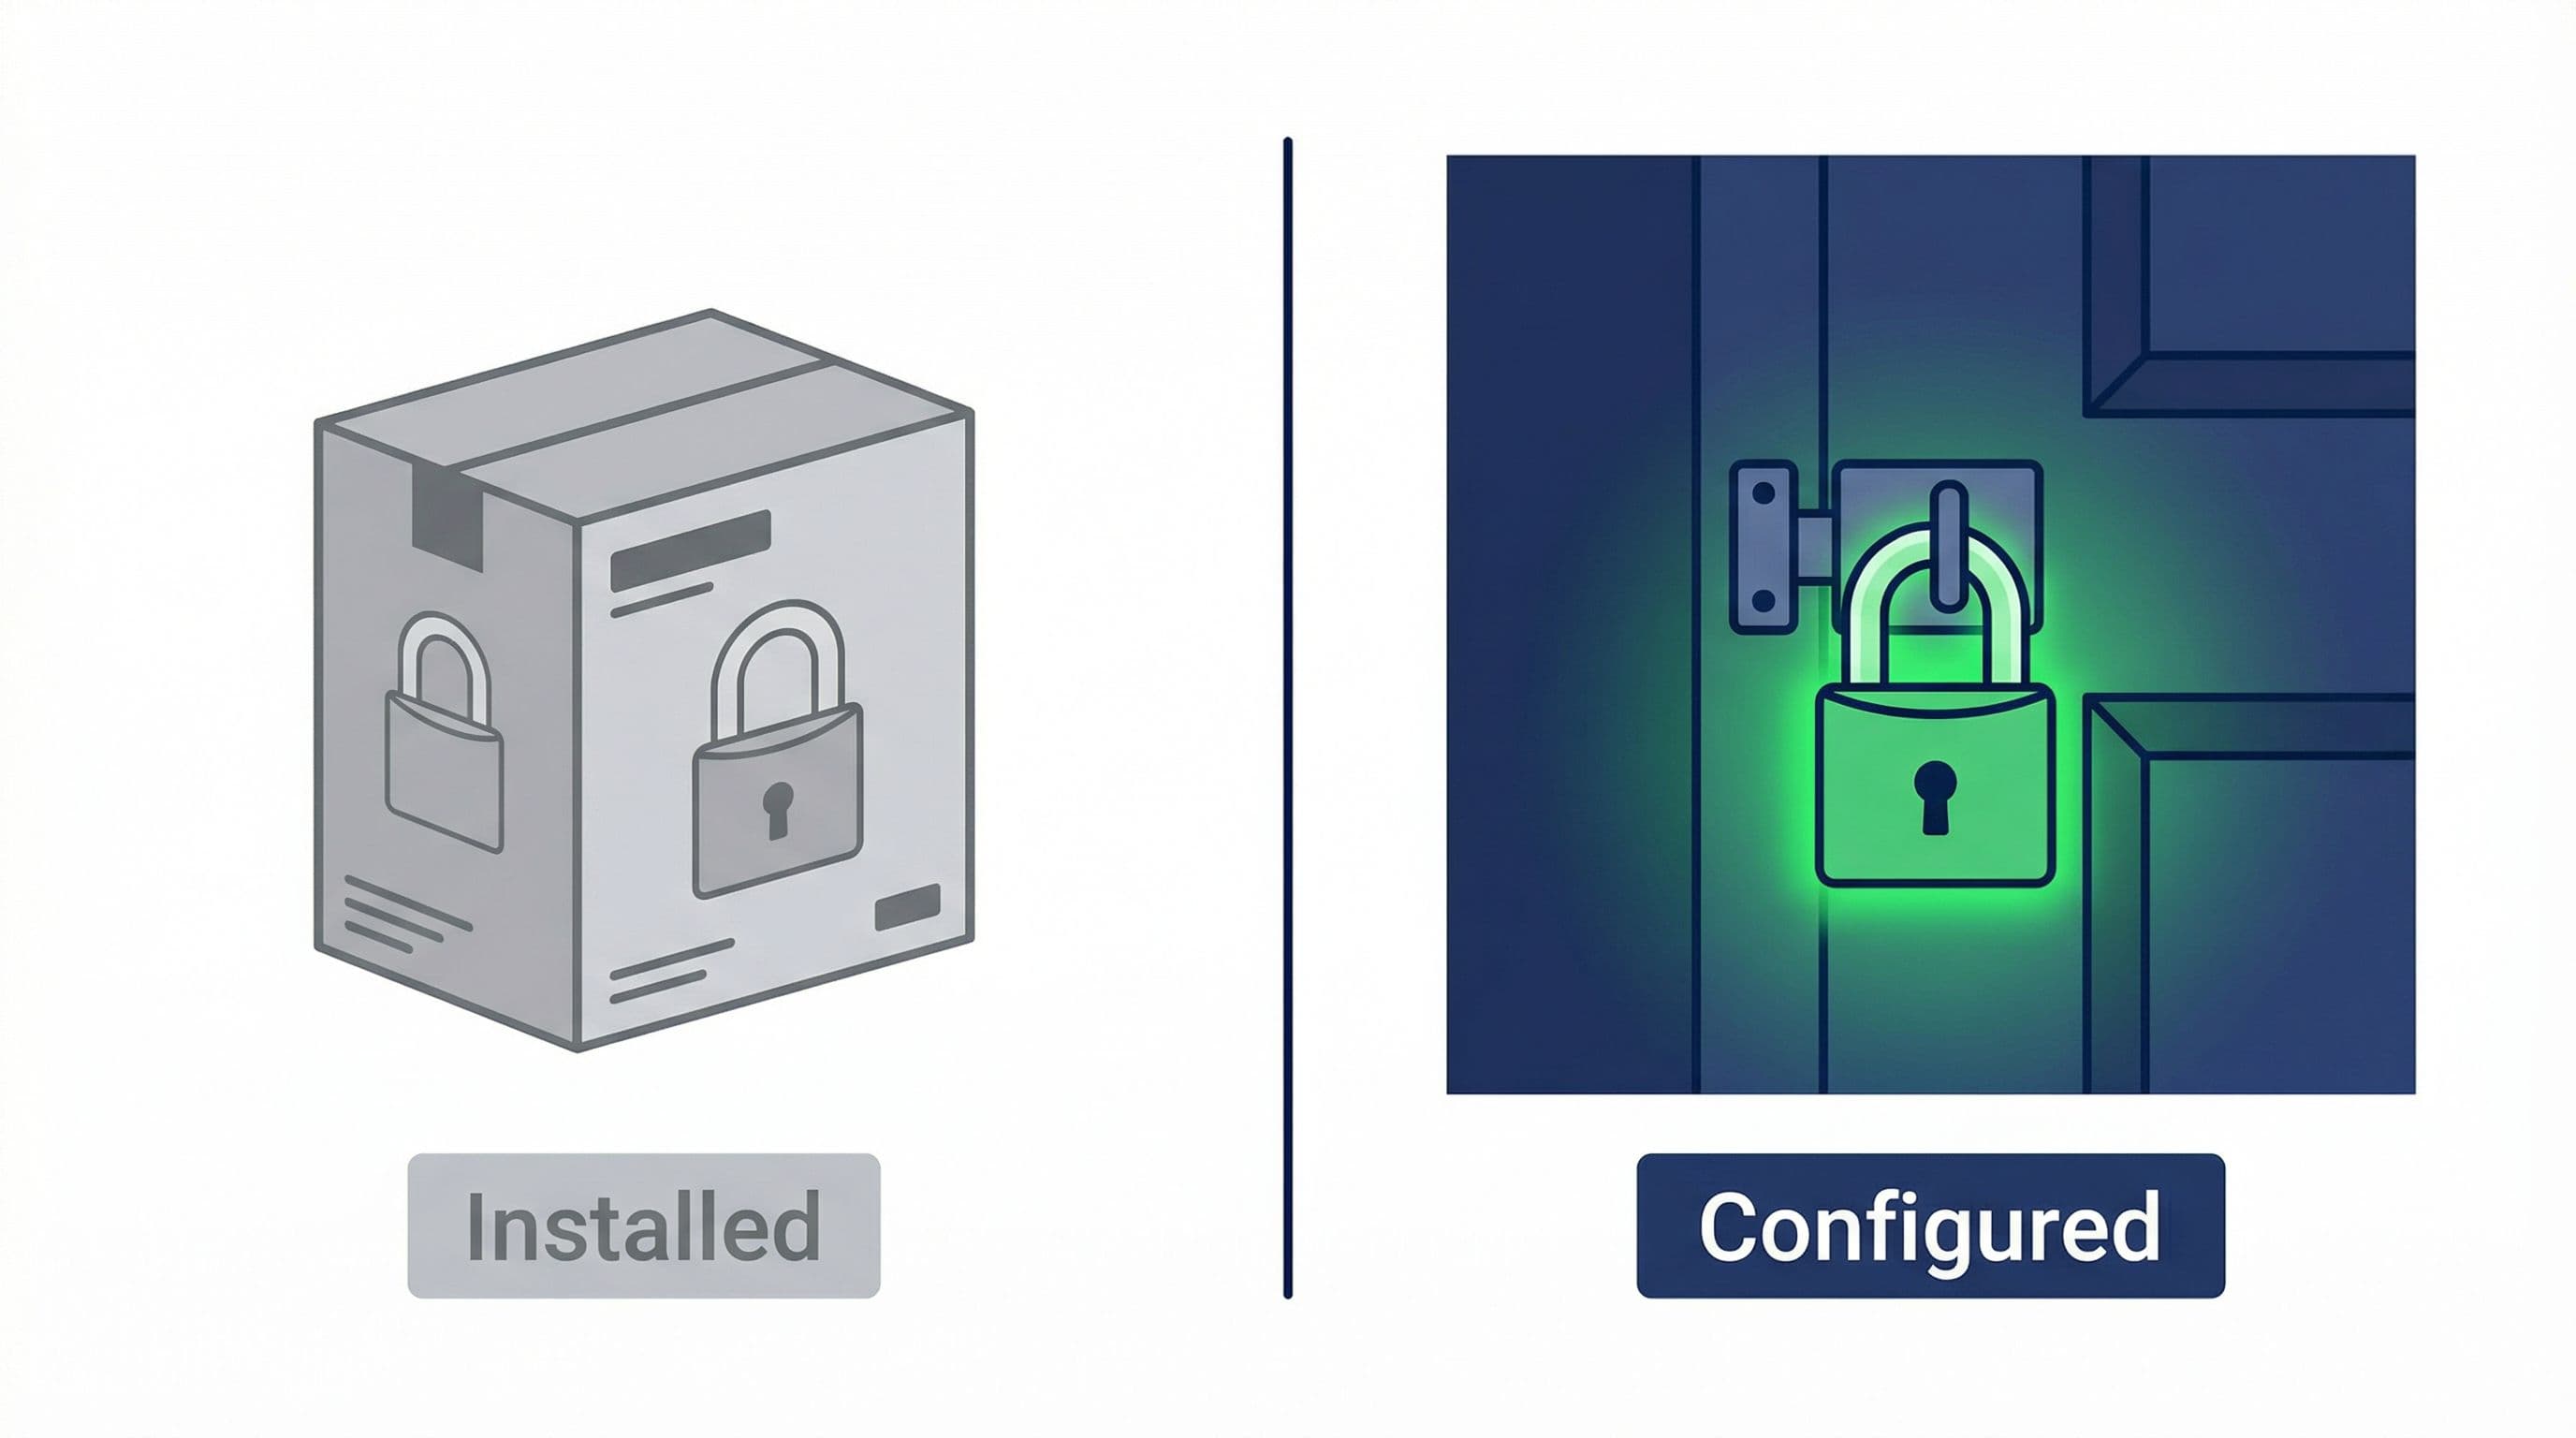
What is the difference between installing and configuring a security plugin?
Installation means the plugin is active on your site. Configuration means it is actually doing what it is supposed to do. A freshly installed Wordfence with default settings has the firewall in Learning Mode (not enforcing), login limits not set, 2FA disabled, and scans not scheduled. It is present but not protective. Configuration is what turns a present plugin into a working one.
Can I set up Wordfence on an existing site or only new ones?
Wordfence works on both new and existing sites. For existing sites, run a full malware scan immediately after installation before doing anything else. Sites that have been running without security plugins — especially on budget hosting — frequently have existing compromises that aren't visible on the front end. Identify and resolve those before configuring ongoing protection.
Will Wordfence slow down my website?
On shared hosting with limited resources, Wordfence can add noticeable overhead — particularly when scans run. Schedule scans for low-traffic periods (early morning) and avoid running them during business hours. On managed hosting, the performance impact is negligible. If you're experiencing significant slowdown from Wordfence on shared hosting, it's often a sign that the hosting itself is under-resourced for your site.
What should I do if Wordfence blocks my own access?
If you get locked out after configuring login limits, you have two options. First, access your hosting control panel (cPanel, Kinsta dashboard, etc.) and temporarily deactivate the Wordfence plugin by renaming its folder via File Manager — this disables it without needing to log into WordPress. Second, use the Wordfence Central dashboard if you set it up during installation — it allows remote management of the plugin. Going forward, whitelist your own IP address in Wordfence settings to prevent accidental lockouts.